Onboarding
NativeExpress shows a three-step onboarding flow the first time someone opens your app.
The steps
| Step | What it does |
|---|---|
| 1. Value proposition | Shows the logo, headline and Continue button. |
| 2. Personalize | Asks “What brings you here?” with four options. |
| 3. Notifications | Explains notifications and offers to request push permission. |
Each screen uses OnboardingHeader for progress dots and the Skip link.
Skipping step 1 or 2 goes to step 3. Skipping step 3 completes onboarding.

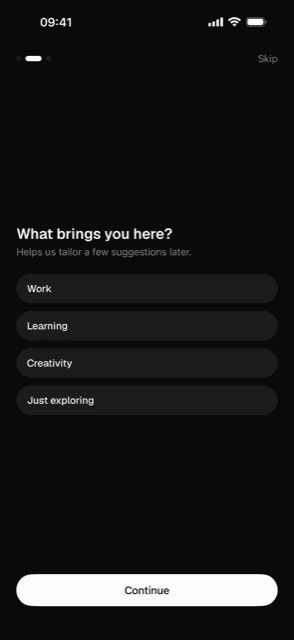
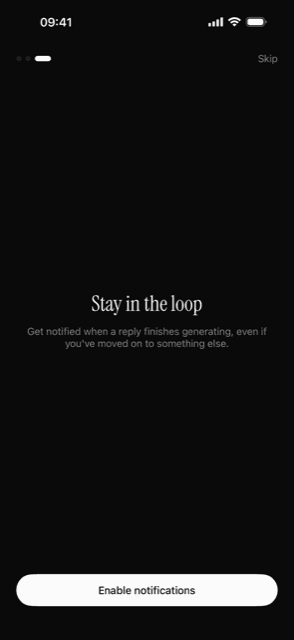
The screens are in src/app/(public)/onboarding/. ONBOARDING_STEPS in
src/lib/onboarding.ts sets their order.
Changing the copy
Edit the onboarding.* keys in src/i18n/en.json and de.json.
For example, change value_headline and value_subtitle to describe your app:
{
  "onboarding": {
    "value_headline": "Plan your next meal",
    "value_subtitle": "Save recipes and build a weekly meal plan."
  }
}
Update these keys in the existing JSON object. Keep the remaining onboarding keys.
Changing the personalize options
Edit ONBOARDING_INTENTS in src/lib/onboarding.ts. The personalize screen
and the saved-answer schema both use this list.
For each new ID, add these keys to both translation files:
onboarding.personalize_option_<id>for the option label.home.intent_caption_<id>for the caption on the Home screen.
Run yarn check:i18n, then complete onboarding with the new option. After
signing in, confirm that Home shows the matching caption.
Saved answers
When onboarding completes, it saves the answers to AsyncStorage under
app.onboarding-pending. The next signed-in session attaches that record to
user.user_metadata.onboarding in Supabase.
The record contains completedAt and answers. Both answers are optional:
intent is absent when the user chose no option, and notifications is absent
when the app has no notifications step. Read the record with
onboardingOf(user) from @/lib/onboarding. The helper returns null when
the user has no valid saved record.
An existing account keeps its own onboarding record. If the Supabase update fails, the pending record remains on the device for another attempt after the app restarts.
The saved notification value records which button the user chose. enabled
does not mean the operating system granted permission. The permission request
also requires OneSignal setup.
When onboarding shows
The entry route, src/app/index.tsx, reads the app.onboarding-done flag:
| State | Destination |
|---|---|
| No session, onboarding not done | /(public)/onboarding |
| No session, onboarding done | /(public)/welcome |
| Signed in | /(protected)/(tabs)/home |
The completion flag is stored on the device. Signing out does not reset it.
When onboarding finishes
useCompleteOnboarding in src/hooks/ ends onboarding. It saves the answers,
sets the completion flag, records onboarding_completed, requests the
onboarding_end paywall placement, then opens the welcome screen. If any of that
fails, the user stays on the last step, sees an error toast and can try again.
It runs from the last step in ONBOARDING_STEPS, whichever screen that is.
Continue and Skip come from useOnboardingSteps, which moves to the next listed
step and completes onboarding on the last one. Because no screen holds the
completion logic, rewriting or deleting the last screen keeps the saved answers,
the event and the paywall.
RevenueCat presents the paywall when configured. If you use
Superwall, its campaign decides whether to show one. The
analytics events paywall_shown and paywall_skipped record
which happened.
Adding a step
Create the screen
Add src/app/(public)/onboarding/<name>.tsx. Start from personalize.tsx:
it renders <OnboardingHeader /> and takes goNext from
useOnboardingSteps for its Continue button. Neither needs a step number.
Add it to the step list
Add a line to ONBOARDING_STEPS where the screen belongs. The list order is
the screen order, and name must match the file name. A screen whose name
does not match shows as step 1.
export const ONBOARDING_STEPS = [
  { name: 'index', href: '/(public)/onboarding' },
  { name: 'personalize', href: '/(public)/onboarding/personalize' },
  { name: '<name>', href: '/(public)/onboarding/<name>' },
  { name: 'notifications', href: '/(public)/onboarding/notifications' },
] as const satisfies readonly { name: string; href: Href }[];
Whichever entry is last completes onboarding.
Register it in the layout
Add the screen inside the existing Stack:
<Stack.Screen name="<name>" />Keep OnboardingFlowProvider around the Stack so answers remain available
when moving between screens.
Save its answer
If the step collects an answer, add the field to onboardingAnswersSchema in
src/lib/onboarding.ts. Pass the answer to goNext or skipToEnd, as the
notifications screen does with goNext({ notifications: 'enabled' }). Before
the last step the answer is kept for the end of the flow; on the last step it
is saved with the others.
Verify
Run yarn typecheck, yarn test and yarn check:i18n. Complete the flow
and repeat it using Skip. Confirm the progress dots count the new step, the
answers are saved and the flow ends on Welcome.
Removing a step
Delete the screen file, its entry in ONBOARDING_STEPS and its <Stack.Screen>
in _layout.tsx. Remove its test under src/__tests__/app/(public)/onboarding/
and its translation keys, then run yarn ci. The progress dots and Skip follow
the shorter list, and whichever screen is now last completes onboarding.
yarn remove:integration onesignal removes the notifications step this way,
together with OneSignal, and onboarding then ends at personalize. See
Removing features and integrations.
If you remove the step by hand but keep push, add a
permission action somewhere else in the app.
Removing onboarding entirely
Simplify the entry route
In src/app/index.tsx, remove the onboarding state, effect and imports.
Keep the session-based redirect:
import { Redirect } from 'expo-router';
import { useSession } from '@/hooks/useSession';

export default function Index() {
  const { session } = useSession();

  return <Redirect href={session ? '/(protected)/(tabs)/home' : '/(public)/welcome'} />;
}
Remove the onboarding screens
Delete src/app/(public)/onboarding/ and its tests in
src/__tests__/app/(public)/onboarding/. Remove the now unused
useOnboardingSteps and its test, useCompleteOnboarding,
ONBOARDING_STEPS, OnboardingFlowProvider and useOnboardingFlow.
If you no longer need saved answers, remove useOnboardingSync from the
root layout and remove the onboarding caption from Home. Update the related
tests and translation keys.
Choose when to show the first paywall
useCompleteOnboarding was the only caller of
presentPaywall('onboarding_end'). Call it from the action where you want
the paywall to appear, or remove that placement from your product flow.
Verify
Run yarn ci. With no saved session, the app opens on Welcome; with a
session, it opens on Home.
Files
- index.tsx - Entry route, reads the completion flag
- _layout.tsx - Stack and OnboardingFlowProvider
- index.tsx - Value proposition
- personalize.tsx - What brings you here?
- notifications.tsx - Push permission primer
- OnboardingHeader.tsx - Progress dots and Skip
- ProgressDots.tsx - The dots OnboardingHeader renders
- useOnboardingSteps.ts - Position, Continue and Skip from the step list
- useCompleteOnboarding.ts - Saves answers, records the event, requests the paywall
- useOnboardingFlow.ts - Answers shared between screens
- useOnboardingSync.ts - Attaches saved answers after sign-in
- lib/onboarding.ts - ONBOARDING_STEPS, ONBOARDING_INTENTS, answer schema
- provider/OnboardingFlowProvider.tsx - Holds answers during the flow