Setting Up NativeExpress
Prerequisites
Before you begin, ensure you have the following installed on your system:
- Node.js (opens in a new tab) (v20 or later)
- yarn (opens in a new tab)
- Git (opens in a new tab)
- Homebrew (opens in a new tab)
- EAS CLI (opens in a new tab)
- Apple Developer Account (opens in a new tab)
- Android Developer Account (opens in a new tab)
- Expo Account (opens in a new tab)
Setup Options
Quick Start Wizard
Complete the following steps to configure your app. The wizard will generate a single CLI command with all your configurations included.
Interactive CLI
Alternatively, if you prefer to configure everything step by step through the CLI prompts, you can use:
npx nativeexpress create-app my-app-name [-ssh]If you use SSH for GitHub authentication, include the -ssh flag when running the command.
This will guide you through various configuration options interactively.
Run the Development Server
Create a prebuild for iOS
Run the following command in your terminal (remove the --platform flag if you want to build for both platforms):
npx expo prebuild --platform iosInstall Pods
Run the following command in your terminal:
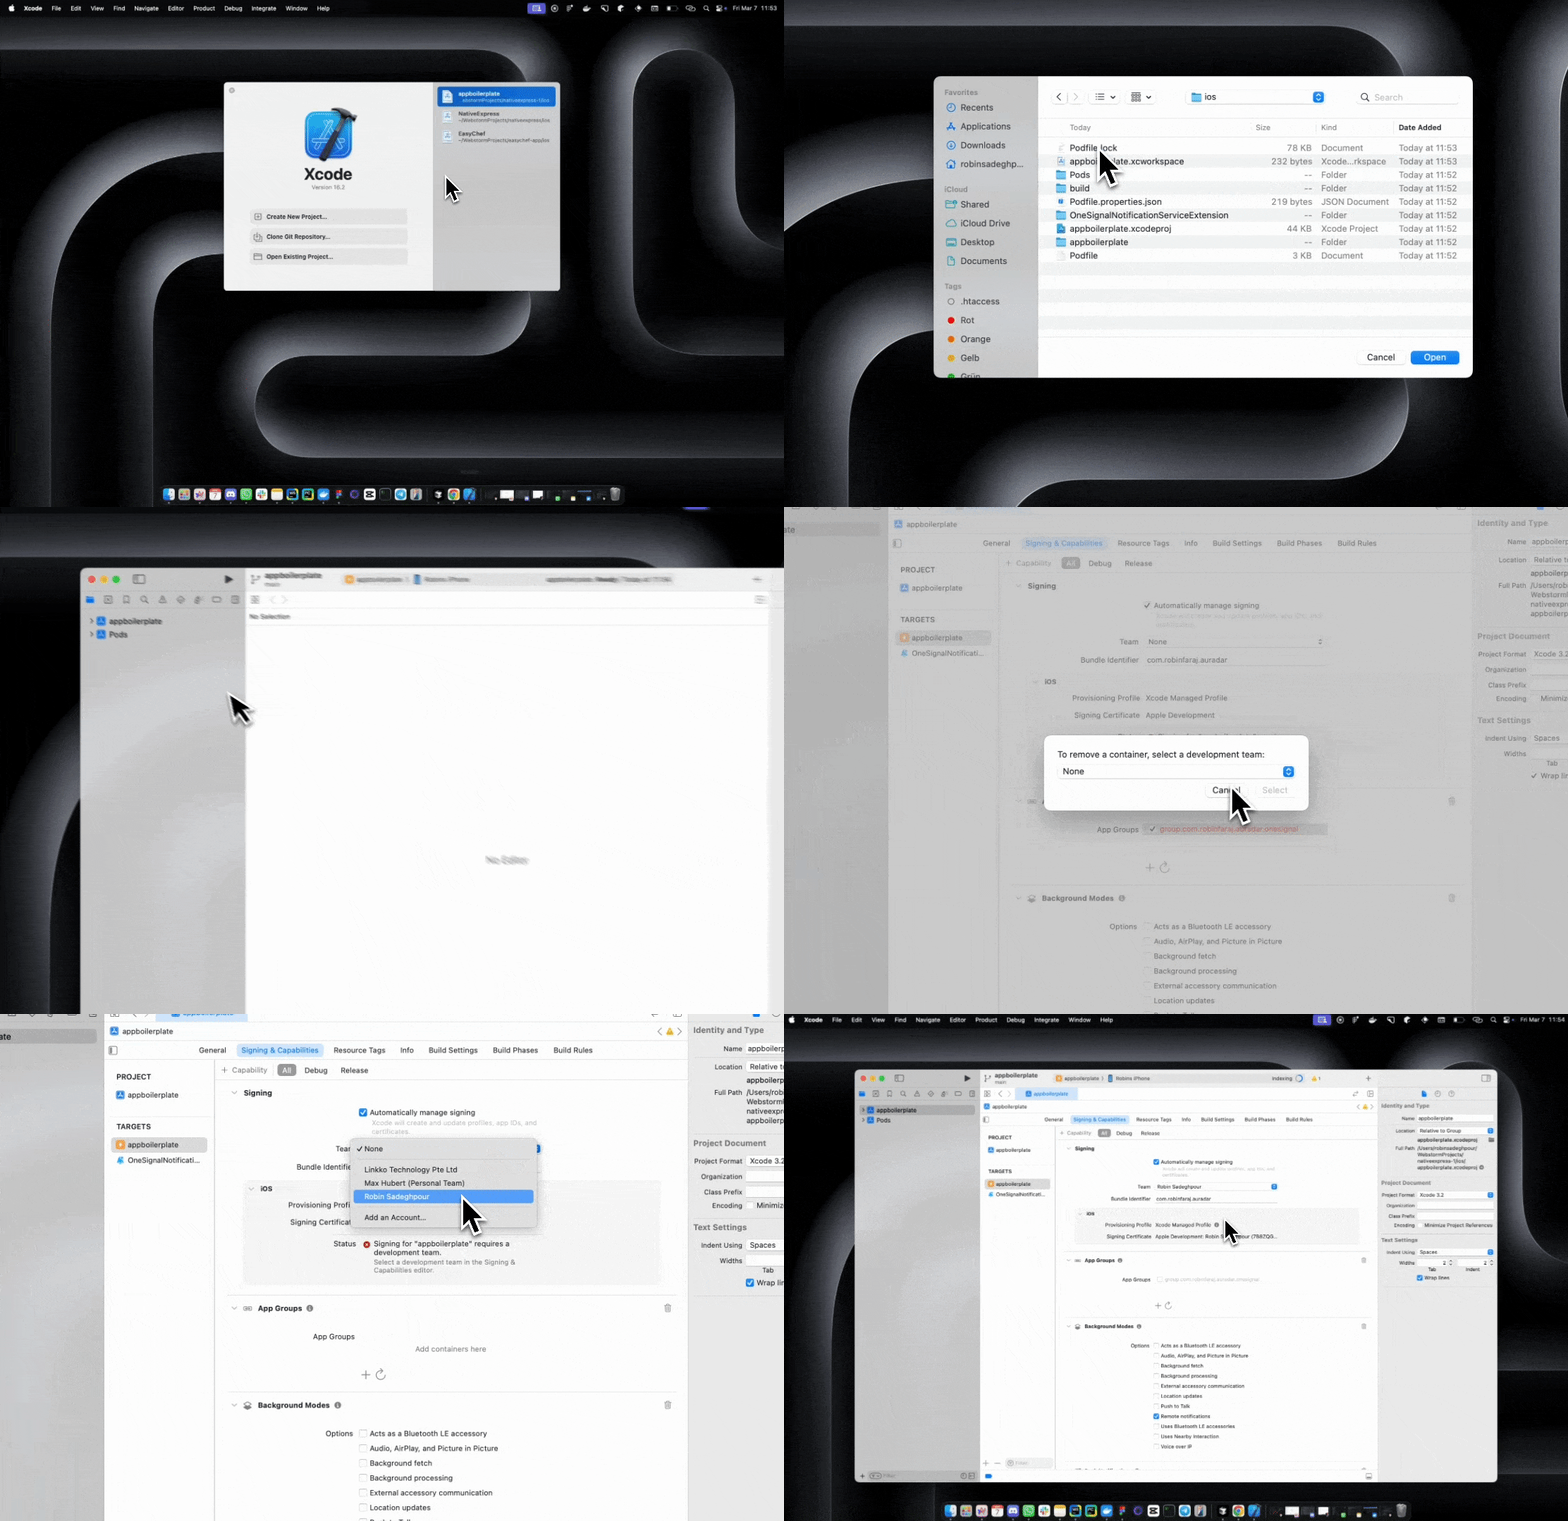
cd ios && pod installConfigure Xcode Signing & Capabilities
After installing pods, you need to set up the signing capability in Xcode:
- Open Xcode
- Click on "Open"
- Navigate to the generated iOS folder and open the .xcworkspace file
- In the left sidebar, click on the project name
- Go to the "Signing & Capabilities" tab
- Select your development team
- Follow the prompts to complete the signing setup
- Be careful to not have any app groups checked that are not intentional

Create a development build for iOS
Run the following command in your terminal:
npx expo run:iosStart the development server
You can now start and ran the app on the simulator any time you want Run the following command in your terminal:
npx expo start -dYou are now ready to explore the other features of NativeExpress and start building your application!
Database Setup
When you first set up your app, the database will be empty. If you want to populate it with example data and apply initial migrations, you'll need to set up the database. If you prefer to start with an empty database, you can skip this step.
For more detailed information about database management, please refer to the Database Guide.
Run Database Migrations and Seed Data
To initialize your database with migrations and seed data, use one of the following commands in your terminal:
For a linked Supabase project, you must first authenticate and link your project:
npx supabase login
npx supabase link
npx supabase db reset --linked
This sequence will authenticate with Supabase, link your local project to the remote one, then reset your database, apply all migrations, and run the seed.sql file for the linked project.
For a local Supabase project:
supabase db resetIf you're using a local setup, make sure to adjust your .env.local file to connect with the local database before running this command.
Supabase Bucket Setup
This step is optional and can be completed later. However, it is required for avatar image uploads to work in the app.
Create a Supabase Bucket
- Go to your Supabase (opens in a new tab) project dashboard
- Navigate to the Storage section in the sidebar
- Click "Create new bucket"
- Name your bucket (e.g., "nativeexpress")
- Configure bucket permissions as needed
Depending on your needs, you can:
- Make the bucket public (anyone can read files)
- Set up specific access policies (e.g., only authenticated users can upload)
- Configure RLS policies for fine-grained access control
Configure Environment Variable
Add the bucket name to your .env.local file:
EXPO_PUBLIC_SUPABASE_BUCKET_NAME="your-bucket-name"
